基础回顾之C编译过程及预处理器
做技术,越做到后面越觉得基础、底层的才是越难得,也会越有技术含量的。最近做的项目有关音视频、图像处理,涉及到的都死c和c++相关的代码。遇到了问题才发现,c和c++才是通用大法。这两块没学好,那也只有玩一玩应用层、UI这些东西。抽空整理下。
编译过程
如果需要弄清整个编译过程,那还得好好复习下编译原理。这里只是通过一个小例子讨论大致过程。
准备好一个helloworld的c文件。内容最好简单如下:
|
|
编译命令
|
|
gcc命令其实依次执行了四步操作:
预处理(Preprocessing)
- 预处理用于将所有的#include头文件以及宏定义替换成其真正的内容,预处理之后得到的仍然是文本文件,但文件体积会大很多。
- 命令:
gcc -E -I./ helloworld.c -o helloworld.i或者直接用cpp helloworld.c -I./ -o helloworld.i - 参数说明:
-E是让编译器在预处理之后就退出,不进行后续编译过程;-I指定头文件目录,这里指定的是我们自定义的头文件目录;-o指定输出文件名。
经过预处理之后代码体积会大很多。如下是预处理之后的部分内容。
12345678910111213141516171819202122232425262728293031323334353637383940414243444546474849505152535455565758596061626364# 1 "helloworld.c"# 1 "<built-in>" 1# 1 "<built-in>" 3# 330 "<built-in>" 3# 1 "<command line>" 1# 1 "<built-in>" 2# 1 "helloworld.c" 2typedef unsigned char __uint8_t;typedef short __int16_t;typedef unsigned short __uint16_t;typedef int __int32_t;typedef unsigned int __uint32_t;typedef long long __int64_t;typedef unsigned long long __uint64_t;typedef struct _opaque_pthread_attr_t __darwin_pthread_attr_t;typedef struct _opaque_pthread_cond_t __darwin_pthread_cond_t;typedef struct _opaque_pthread_condattr_t __darwin_pthread_condattr_t;typedef unsigned long __darwin_pthread_key_t;typedef struct _opaque_pthread_mutex_t __darwin_pthread_mutex_t;typedef struct _opaque_pthread_mutexattr_t __darwin_pthread_mutexattr_t;FILE *fopen(const char * restrict __filename, const char * restrict __mode) __asm("_" "fopen" );int fprintf(FILE * restrict, const char * restrict, ...) __attribute__((__format__ (__printf__, 2, 3)));int fputc(int, FILE *);int fputs(const char * restrict, FILE * restrict) __asm("_" "fputs" );size_t fread(void * restrict __ptr, size_t __size, size_t __nitems, FILE * restrict __stream);FILE *freopen(const char * restrict, const char * restrict,FILE * restrict) __asm("_" "freopen" );int fscanf(FILE * restrict, const char * restrict, ...) __attribute__((__format__ (__scanf__, 2, 3)));int fseek(FILE *, long, int);int fsetpos(FILE *, const fpos_t *);long ftell(FILE *);size_t fwrite(const void * restrict __ptr, size_t __size, size_t __nitems, FILE * restrict __stream) __asm("_" "fwrite" );int getc(FILE *);int getchar(void);char *gets(char *);void perror(const char *);int printf(const char * restrict, ...) __attribute__((__format__ (__printf__, 1, 2)));int putc(int, FILE *);int putchar(int);int puts(const char *);int remove(const char *);int rename (const char *__old, const char *__new);void rewind(FILE *);int scanf(const char * restrict, ...) __attribute__((__format__ (__scanf__, 1, 2)));void setbuf(FILE * restrict, char * restrict);int setvbuf(FILE * restrict, char * restrict, int, size_t);int sprintf(char * restrict, const char * restrict, ...) __attribute__((__format__ (__printf__, 2, 3))) __attribute__((__availability__(swift, unavailable, message="Use snprintf instead.")));int sscanf(const char * restrict, const char * restrict, ...) __attribute__((__format__ (__scanf__, 2, 3)));FILE *tmpfile(void);__attribute__((__availability__(swift, unavailable, message="Use mkstemp(3) instead.")))__attribute__((deprecated("This function is provided for compatibility reasons only. Due to security concerns inherent in the design of tmpnam(3), it is highly recommended that you use mkstemp(3) instead.")))... 中间很多内容这里省略extern int __vsnprintf_chk (char * restrict, size_t, int, size_t,const char * restrict, va_list);# 499 "/Applications/Xcode.app/Contents/Developer/Platforms/MacOSX.platform/Developer/SDKs/MacOSX10.12.sdk/usr/include/stdio.h" 2 3 4# 2 "helloworld.c" 2int main(){printf("Hello World!\n");return 0;}
编译(Compilation),
- 这里的编译不是指程序从源文件到二进制程序的全部过程,而是指将经过预处理之后的程序转换成特定汇编代码(assembly code)的过程。
- 命令:gcc -S -I./ helloworld.c -o helloworld.s
- 参数:
-S为了编译之后停止。后面的两个参数含义和预处理的时候一样 经过编译之后的内容如下。
12345678910111213141516171819202122232425262728293031323334.section __TEXT,__text,regular,pure_instructions.macosx_version_min 10, 12.globl _main.p2align 4, 0x90_main: ## @main.cfi_startproc## BB#0:pushq %rbpLtmp0:.cfi_def_cfa_offset 16Ltmp1:.cfi_offset %rbp, -16movq %rsp, %rbpLtmp2:.cfi_def_cfa_register %rbpsubq $16, %rspleaq L_.str(%rip), %rdimovl $0, -4(%rbp)movb $0, %alcallq _printfxorl %ecx, %ecxmovl %eax, -8(%rbp) ## 4-byte Spillmovl %ecx, %eaxaddq $16, %rsppopq %rbpretq.cfi_endproc.section __TEXT,__cstring,cstring_literalsL_.str: ## @.str.asciz "Hello World!\n".subsections_via_symbols
汇编(Assemble),
- 汇编过程将上一步的汇编代码转换成机器码(machine code),这一步产生的文件叫做目标文件,是二进制格式。如果有多个文件需要为每一个源文件产生一个目标文件。
- 命令:as helloworld.s -o helloworld.o 或者 gcc -c helloworld.s -o helloworld.o
- 链接(Linking)。
- 链接过程将多个目标文以及所需的库文件(.so等)链接成最终的可执行文件(executable file)。
- 命令:ld -o helloworld.out helloworld.o
**.o**.o。格式其实就是ld(选项)(参数)参数就是需要连接的目标文件。由于这里没有生成其他目标文件,所以这段不会连接成功的。具体的命令可以看这里ld命令
走完上面的步骤可以得到如下几个文件。
其实我们平时写代码的到得到可执行文件的整个过程可以用下图来概括。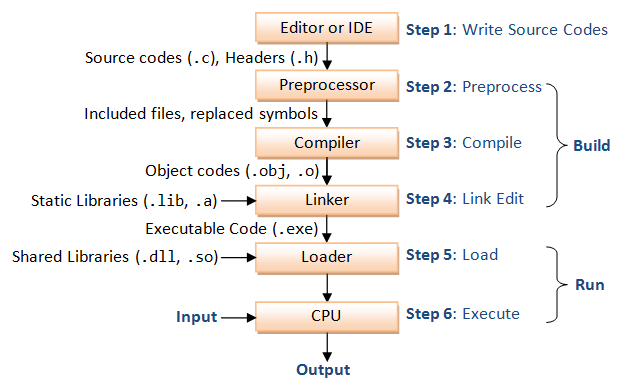
预处理器
上面把基本的编译过程讲完了,现在就开始进入今天的正题。
预处理前的操作
再进行预处理前,编译器会对源代码记性一些翻译过程。其中有几点需要知道:
- 源代码中的资费映射到元字符集。使得C外观更加国际化
- 预处理表达式的长度为一逻辑行。
查找反斜杠后紧跟换行符的实例并删除。也即是预处理会删除反斜杠和换行符的组合。
类似
12printf("Hello, \World!\n");两行物理行变为一行
printf("Hello,World!\n");经过测试在Xcode中会上面的形式会比项目多很多空格。- 其实这就是为什么我们能够用宏定义定义函数的原理。
- 文本划分为预处理语言符号、空白字符及注释序列。注意编译器会有空格代替注释
预处理指令
所有预处理指令都是以#开头。关于#define和const定义常量的区别也是需要值得注意的地方。#define做的是暴力替换,而const是针对性的。
语言符号及字符型符号
- 字符型符号:额外的空格当成替换文本的一部分,空格也是主体的一部分。
- 语言符号:空格只是分隔主体的符号。
例子#define TEST 4 * 8
- 字符型符号将TEST替换为
4 * 8 - 语言符号将TEST替换为
4 * 8
C编译器把宏主体当成的是字符型符号
判断宏定义想不相同通过语言定义符号来确定。比如#define TEST 48和上面的就不是相同的宏定义因为它只有一个语言符号4``8。上面有三个分别是4、空格、8
define中使用参数
使用参数很简单,就是#define TEST(X) X*X。规则如下:
特别需要注意的是宏参数和函数参数的区别,宏参数是进行严格的特换。这如果使用不懂就会出现非常严重的错误。
使用#参数:宏参数创建字符串
| 宏定义 | 调用 | 结果 |
|---|---|---|
#define TESTPF(x) printf("test "#x" * "#x"=%d\n",(x)*(x)); |
TESTPF(5 + 5) |
test 5 + 5 * 5 + 5=100 |
#define TESTPF(x) printf("test x * x=%d\n",(x)*(x)); |
TESTPF(5 + 5); |
test x * x=100 |
可以看到#参数的作用就是把字符串中的x也进行了替换。
使用##参数:预处理粘合剂
##作用是把两个语言符号组合为单个语言符号。
例子:
|
|
...和__VA_ARGS__:可变宏
这个其实在iOS开发中还是用得挺多的。
例子
|
|
特别注意。省略号必须在最后一个参数位置。根据这个道理,有些同学可能就能联想到某些语言可变参数的位置为什么一定要在最后把。比如python
文件包含
预处理器发现#include指令后,会寻找跟在后面的文件,把这个文件中的内容包含到当前文件中。
头文件
OC中有.h和.m文件,这和C里面的.h和.c是同一个道理。所以这里就不多说了。具体看图。
其他预处理指令
#undef取消已定义的宏#if如果给定条件为真,则编译下面代码#elif如果前面的#if给定条件不为真,当前条件为真,则编译下面代码#endif结束一个#if……#else条件编译块#ifdef如果宏已经定义,则编译下面代码#ifndef如果宏没有定义,则编译下面代码#pragma指令没有正式的定义。编译器可以自定义其用途。典型的用法是禁止或允许某些烦人的警告信息。
上面这些预处理指令,用得比较频繁。大家应该不陌生。还多一些平时用得不多的。
#line指令可以改变编译器用来指出警告和错误信息的文件号和行号。#error停止编译并显示错误信息
预处理宏
C标准制定的一些预处理宏。
额外补充一个__func__预定义标识符。这个是C99标准提供的。用于标识当前函数。
上面这些预处理宏经常用于打印一些日志信息。
扩展阅读
C programming Tutorial Introduction to C Programming (for Novices & First-Time Programmers)
C/C++预处理指令#define,#ifdef,#ifndef,#endif…